Your essential guide to how to add a WordPress blog post
Step 1
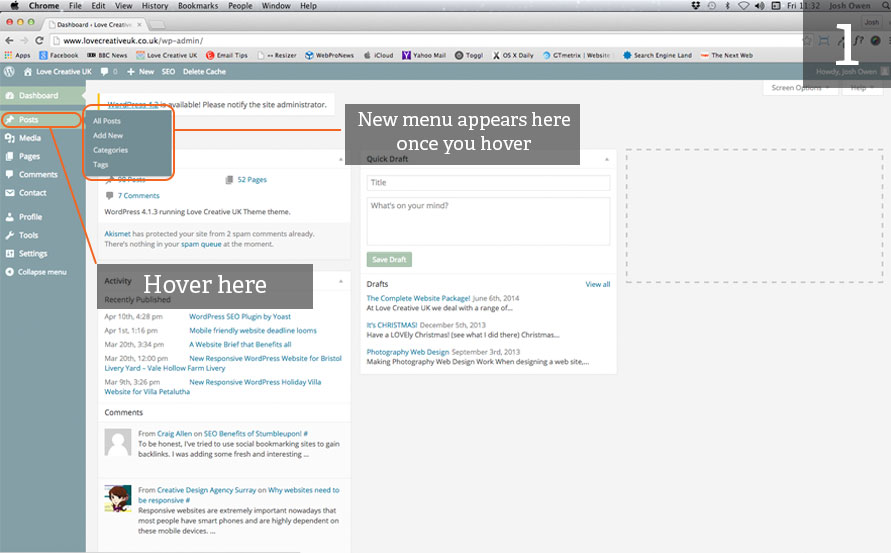
Once you have signed into your WordPress backend you will be exposed to your dashboard. For you to add a WordPress blog post you need to hover over ‘Posts’ in the sidebar to the left to bring bring up a sub-menu, no need to click ‘Posts’.
Step 2
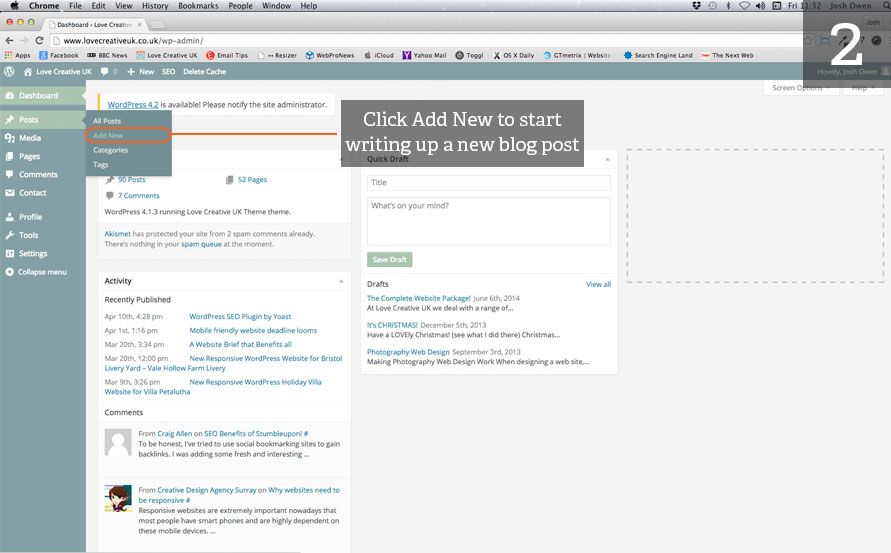
As you hover over it the sub-menu appears and you need to click on ‘Add New’ which will take you to a need page where you can begin your blog post.
Step 3
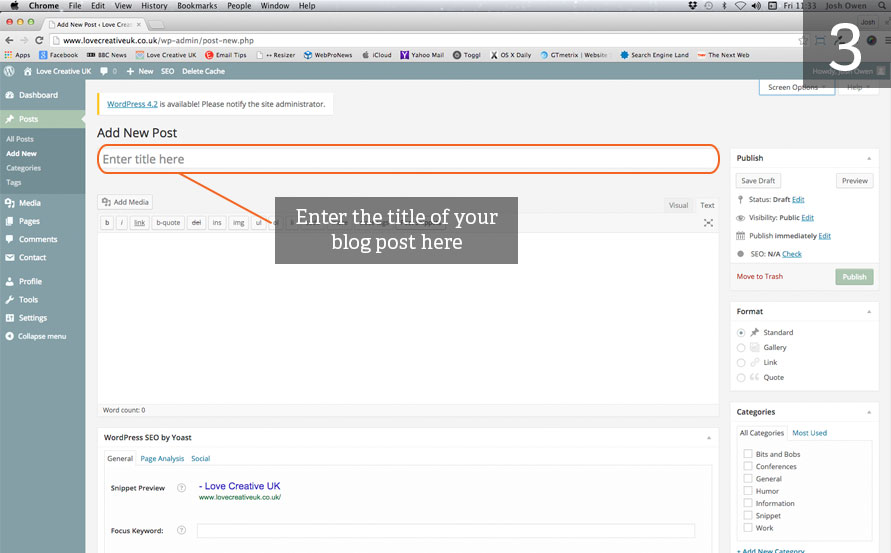
Once you’ve clicked ‘Add New’ you will taken to this blank canvas to begin your insightful masterpiece. Firstly you need to give your WordPress blog post a title by filling out the ‘Enter title here’ box.
Step 4
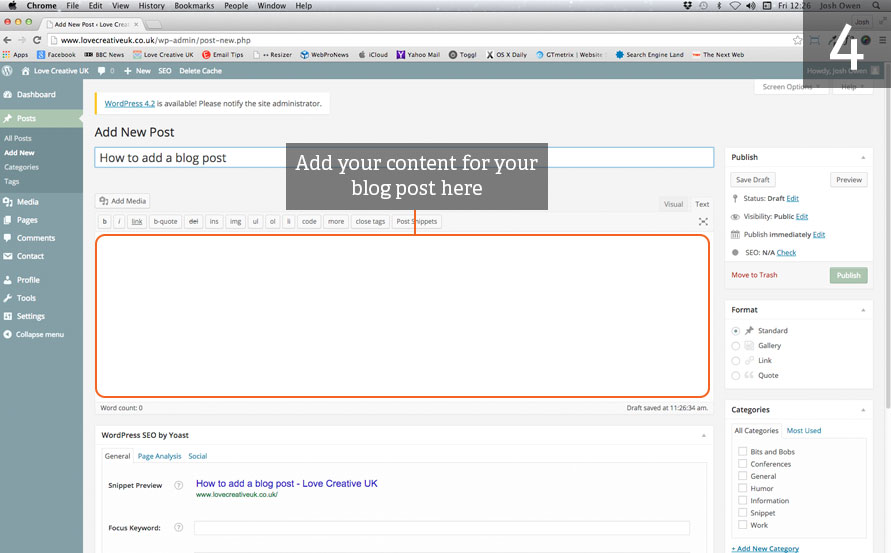
The next step is to add your content for your WordPress blog post. Simply click in the blank space and start typing away to make those words in your head appear on screen.
Step 5
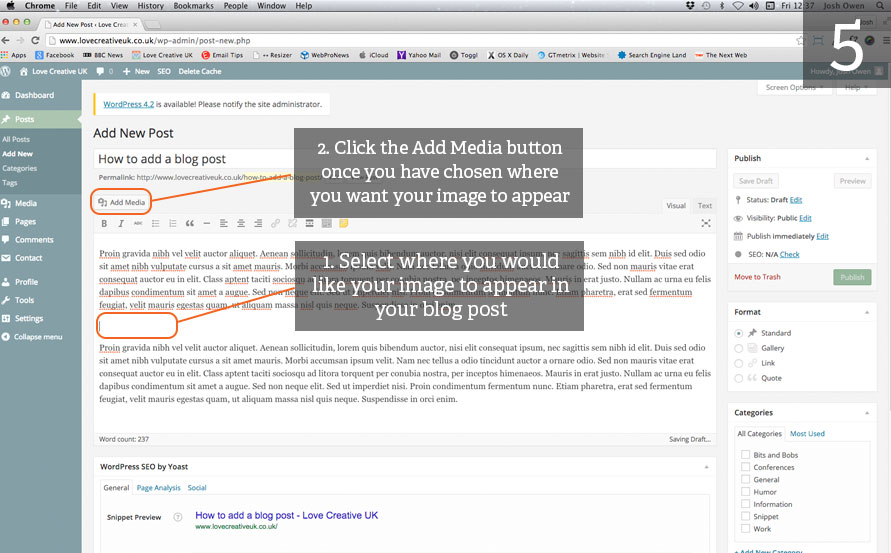
Once you’re happy with your content, it is time to bring it to life with some imagery. Firstly you need to decide where in your content you would like your image to appear. With your mouse click where you would like it and then create some space for it by simply pressing the enter key a couple of times. Then if you look above the content box you’ll see a button that says ‘Add Media’, click on it.
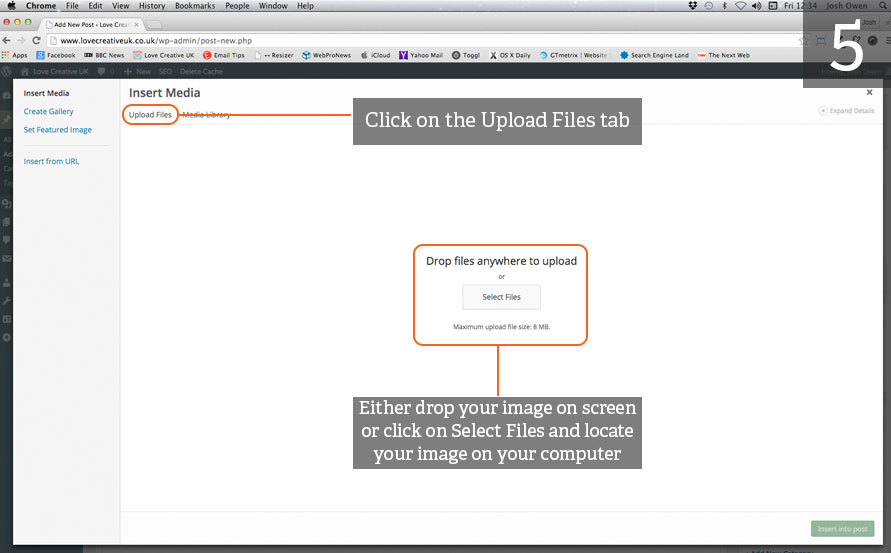
A window will pop up and it will be on the ‘Media Library’ tab. Your library will either be empty or filled with images from previous blog posts or pages from your website. You need to click on the ‘Upload Files’ tab which will bring up a nice blank window with instructions in the middle. Now you have two options, you can simply drag an image onto the window from somewhere on your computer and release the mouse to upload the image or you can click the ‘Select Files’ button and then navigate your way through your computer until you find the image you wish to add.
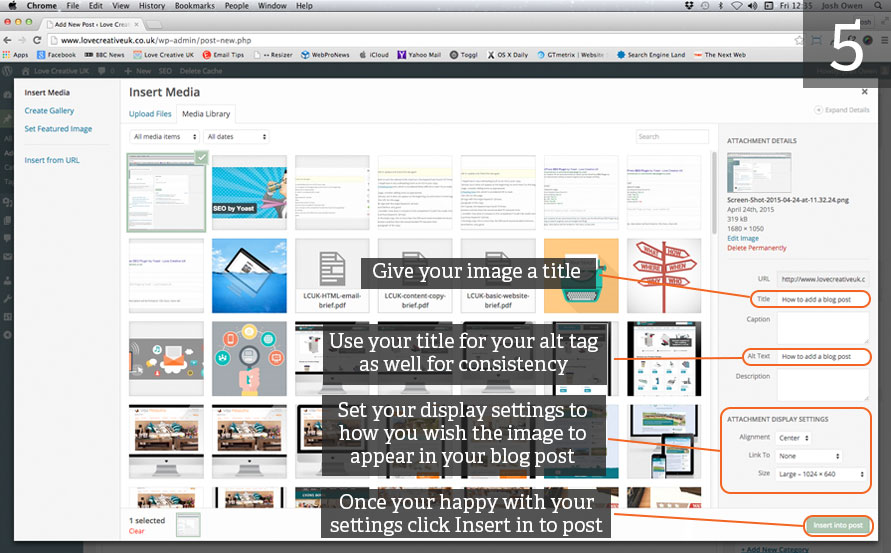
Once you’ve chosen your image, you need to give it a title, alt tag and set the settings for how you wish the image to appear. Make sure your title describes what the image is this will allow users to bring up the title when they hover over the image just incase they aren’t sure what it is. It is a good idea to set your alt tag to be the same. Alt tags are commonly used for visionally impaired users using a voice over tool to read the text out to them. So when it gets to an image it will read the alt tag out to them and since you’ve set it to be a description of the image, they will understand what it is. All that is left for you to do is set the image to how you wish it to be displayed and whether you want it to link to another page. Then click the ‘Insert into post’ button.
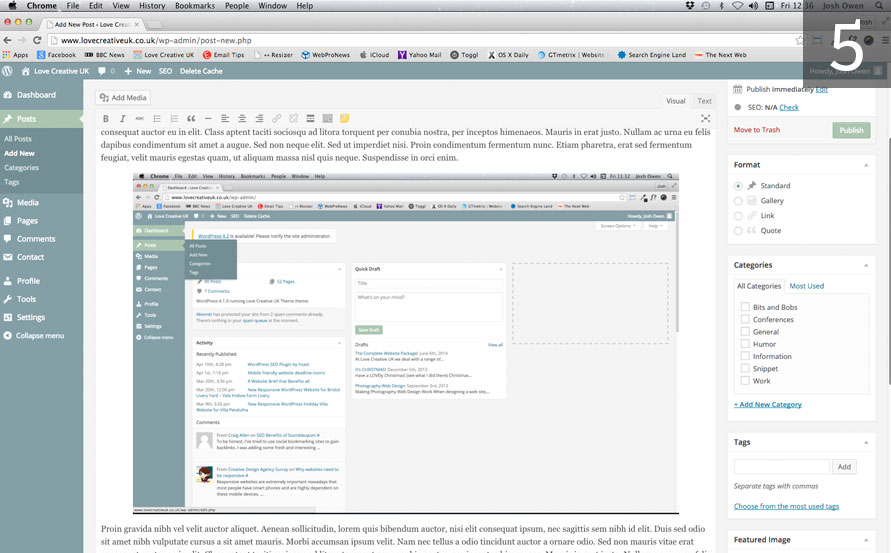
And there you have it, your image is now in your blog post. Repeat as necessary.
Note: Step 5 can be done as you are writing your content.
Step 6
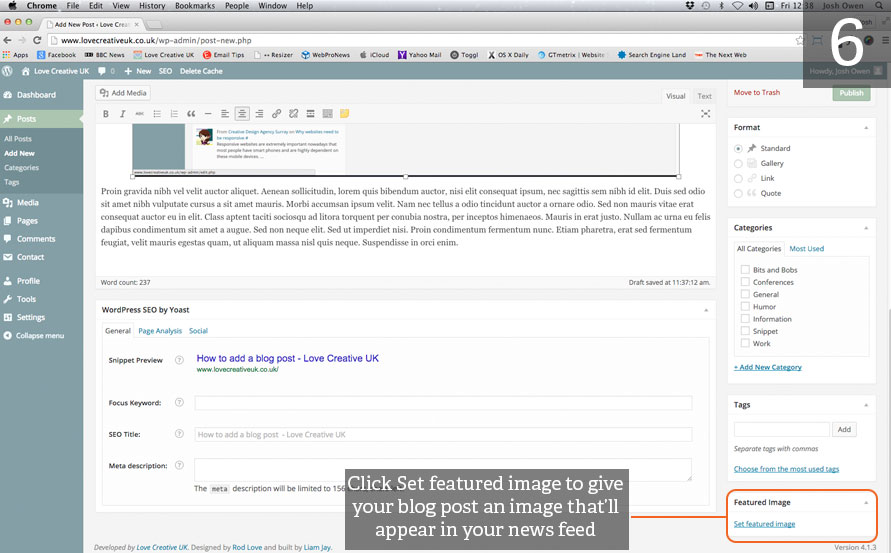
When you have published your WordPress blog post it will appear in your news feed on your website. This will feature the title of your blog post as well as a snippet of the content. It will also have an image on show and to set this image you need to go to the ‘Featured Image’ section. Once there simply click ‘Set featured image’.
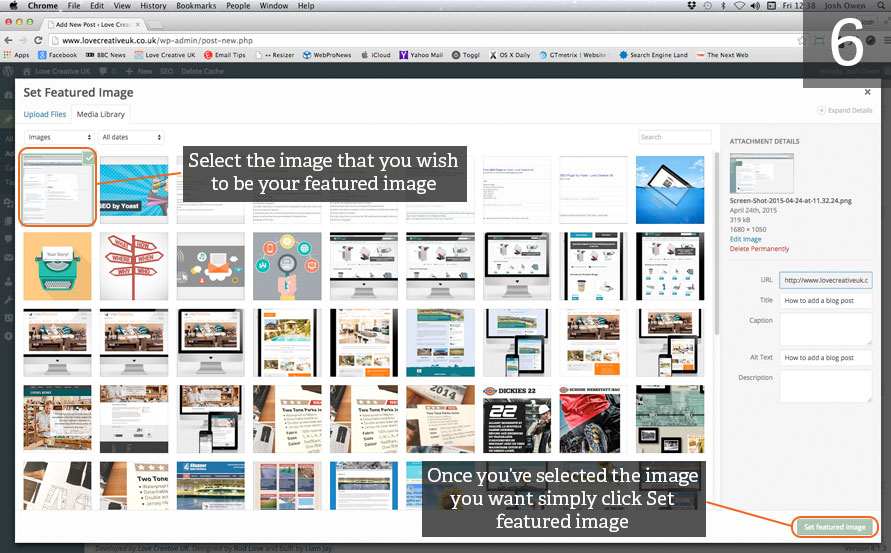
A window will pop and you will be able select an image from your ‘Media Library’. We recommend that you choose an image that you use in the WordPress blog post you are writing because this creates a visual link for the user from the news feed to the blog post. This lets them know that they are on the blog post that they wish to read. Simply select the image you want and then click the ‘Set featured image’ button in the bottom right corner. If you wish to upload a new image follow Step 5 above but you won’t be required to set the display settings.
Step 7 (Optional)
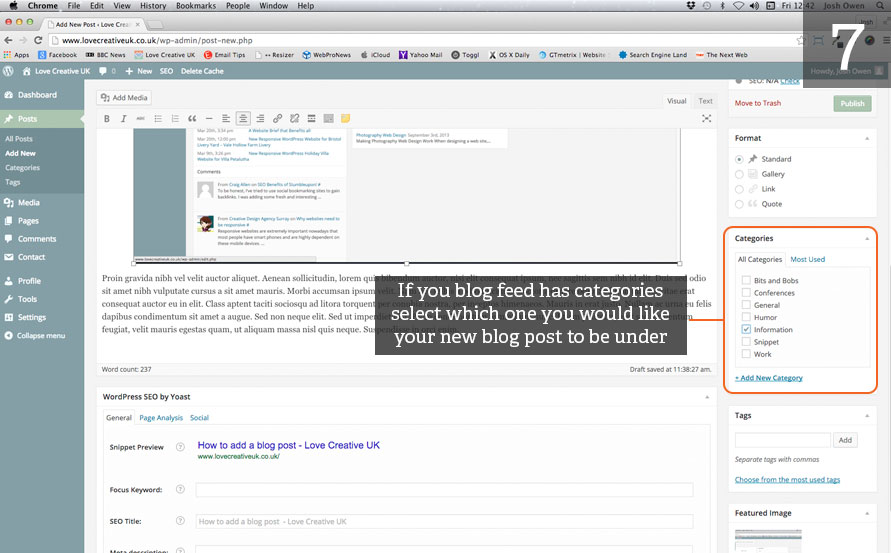
Some websites will have different categories for their news feed so that the user can navigate through the category they wish to read about. For example BBC News has multiple categories so if a user just wanted to read about technology news they can click the technology tab. That is why this step is optional as some websites won’t have categories but rather just a news feed where all their WordPress blog posts appear. To set a category simply locate the ‘Categories’ section and click which category you would like your blog post to appear under.
Step 8
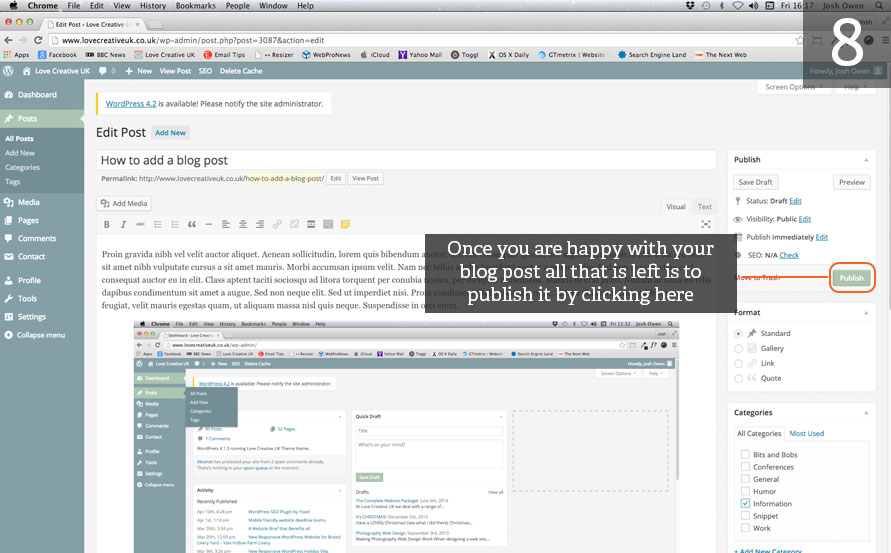
The final step is to publish your WordPress blog post on your website. Once you are happy with your content, images and have set a featured image you simply click the ‘Publish’ button in the top right to send it out to the world wide web.
If you have a WordPress website project you would like to discuss with us please feel to drop us a line via our contact form or either call our Bristol office on 01761 690019 or our Taunton office on 01823 765171.